Arch Linux with btrfs and KDE Plasma
Published on: September 2, 2021
Video
Greetings
Arch_Linux_Install_Kde_Plasma_btrfs
Hi all, in this video i will show how to install Arch Linux with KDE Plasma and btrfs.
KDE is a software project currently comprising a desktop environment known as Plasma, a collection of libraries and frameworks (KDE Frameworks) and several applications (KDE Applications) as well.
btrfs is a modern copy on write (CoW) filesystem for Linux.
I hope you enjoy!
Links
Steps
Pre-Install
Update the system clock
$ timedatectl set-ntp true
Partitioning
We will create as following partition scheme:
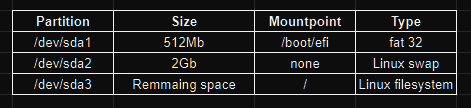
$ cfdisk /dev/[your_device]
We will create only three partitions using cfdisk utility:
- efi with 512Mb
- Swap
- / btrfs remanning space
If you have have doubt about swap space necessary for you, see the table bellow:
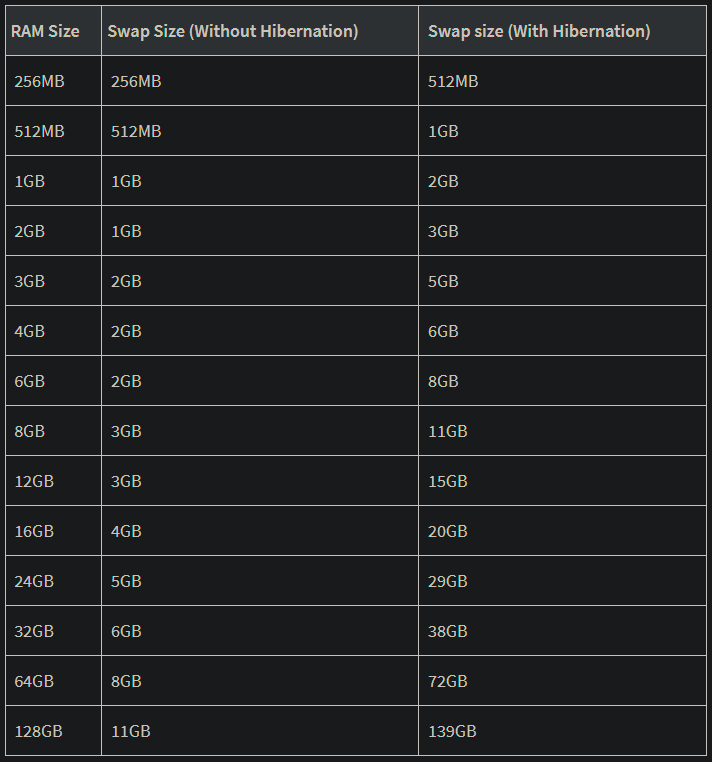
Follow the video…
Formatting
$ mksfs.fat -F32 -n "EFI" /dev/sda1
$ mkswap -L "Swap" /dev/sda2
$ mkfs.btrfs -f -L "System" /dev/sda3
Mounting
$ mount -t btrfs -o ssd,noatime,autodefrag,compress=zstd:5 /dev/sda3 /mnt
$ btrfs subvolume create /mnt/@
$ btrfs subvolume create /mnt/@home
$ btrfs subvolume create /mnt/@snapshots
$ umount /mnt
$ mount -t btfs -o ssd,noatime,autodefrag,compress=zstd:5,subvol=@ /dev/sda3  /mnt
$ mkdir -p /mnt/{boot/efi,home,.snapshots}
$
$ mount -t btfs -o ssd,noatime,autodefrag,compress=zstd:5,subvol=@home /dev/sda3 /mnt/home
$ mount -t btfs -o ssd,noatime,autodefrag,compress=zstd:5,subvol=@snapshots /dev/sda3 /mnt/snapshots
$ mount /dev/sda1 /mnt/boot/efi
$ swapon /dev/sda2
Install Base System
$ pacstrap /mnt base base-devel linux-zen linux-zen-headers \
linux-firmware git vim sudo grub grub-btrfs efibootmgr mtools \
dosfstools btrfs-progs networkmanager xdg-user-dirs
We will install Zen Kernel, result of a collaborative effort of kernel hackers to provide the best Linux kernel possible for everyday systems.
Please, add the following package in list above, as your processor.
| Processor | package | | Intel | intel-ucode | | AMD | amd-ucode |
Configure the system
Generate fstab
$  genfstab -U /mnt >> /mnt/etc/fstab
$ cat /mnt/etc/fstab
Chroot
$ arch-chroot /mnt
Time zone
$ ln -sf /usr/share/zoneinfo/America/Recife /etc/localtime
$ hwclock --systohc
The format for this command is: ln -sf /usr/share/zoneinfo/Region/City /etc/localtime
Type timedatectl list-timezones to choose a list of regions and cities. Then you can adapt this command to your system.
Localization
You can use vim or nano as text editor, if you will use nano, install with pacman -S nano.
Edit /etc/locale.gen and uncomment en_US.UTF-8 UTF-8.
After, type:
$ locale-gen
Create the /etc/locale.conf file, and set the LANG variable accordingly:
LANG=en_US.UTF-8
Network Configuration
Create the hostname file:
$ echo "your_Hostname">/etc/hostname
Add matching entries to /etc/hosts:
127.0.0.1	localhost
::1		localhost
127.0.0.1	your_Hostname.localdomain	your_Hostname
Enable Network Manager:
$ systemctl enable NetworkManager
mkinitcpio
Edit /etc/mkinitcpio.conf and include btrfs on line 7:
MODULES=(btrfs)
And type:
$ mkinitcpio -p linux-zen
Install grub
$  grub-install --target=x86_64-efi --efi-directory=/boot/efi \
--bootloader-id=GRUB
$ grub-mkconfig -o /boot/grub/grub.cfg
Root Password
Type the following command and set the password for root:
$ passwd
Exit, umount and reboot
$ exit
$ umount -a
$ reboot
Create New User
$ useradd -m -G wheel your_username
$ passwd yourusername
$ export EDITOR=vim
$ visudo
Uncomment line 82, save, exit and login as new user.
Test sudo command:
$ sudo pacman -Syyu
Install Xorg
$ sudo pacman -S xorg
Install KDE Plasma
$ sudo pacman -S plasma kde-applications sddm pipewire \
pipewire-pulse pipewire-alsa pipewire-jack firefox
$ sudo systemctl enable sddm
$ reboot
Enable AUR
$ git clone https://aur.archlinux.org/yay-bin.git
$ cd yay-bin
$ makepkg -si
$ cd ..
$ rm -rfv yay-bin/
Install and Config Snapper
$ sudo pacman -S snapper
$ yay -S snapper-gui
$
$ sudo umount /.snapshots
$ sudo rm -rf /.snapshots
$ sudo snapper -c root create-config /
$ sudo btrfs subvolume delete /.snapshots
$ sudo mkdir /.snapshots
$ sudo chmod a+rx /.snapshots
$

sudo chmod 750 /.snapshots
$ sudo chown :wheel /.snapshots
$ sudo mount -a
Edit /etc/snapper/configs/root:
Put your username on line 21 between the quotation marks.
ALLOW_USERS="your_username_here"
Go to line 50 and change to:
# limits for timeline cleanup
TIMELINE_MIN_AGE="1800"
TIMELINE_LIMIT_HOURLY="5"
TIMELINE_LIMIT_DAILY="7"
TIMELINE_LIMIT_WEEKLY="0"
TIMELINE_LIMIT_MONTHLY="0"
TIMELINE_LIMIT_YEARLY="0"
This parameters are sugestion on Arch Linux Wiki with only 5 hourly snapshots, 7 daily ones, no monthly and no yearly ones.
Start the Services
$ sudo systemctl enable --now snapper-timeline.timer
$ sudo systemctl enable --now snapper-cleanup.timer
$ sudo systemctl enable --now grub-btrfs.path
First Snapshot
Follow the video…