Install Ubuntu 21.04 with btrfs + snapper + grub-btrfs
Published on: August 24, 2021
Table of Contents
Video
Greetings
Hi all, in this video i will show how to Install Ubuntu 21.04 with btrfs filesystem, snapper and grub-btrfs.
- You need have ssd, if you use mechanical hdd, please install ext4.
- Snapper is a tool that helps with managing snapshots of btrfs subvolumes. It can create and compare snapshots, revert between snapshots, and supports automatic snapshots timelines.
- grub-btrfs include btrfs snapshots at boot options. (Grub menu)
I hope you enjoy!
Links
Steps
1. Install Ubuntu
Important, at first step, click close button to exit installation.
We will need hack two files.
Open a terminal. You can use nano editor,
i will use vim, so:
$ sudo apt install vim
Edit the file /usr/lib/partman/mount.d/70btrfs:
Start the console and type:
$ sudo vim /usr/lib/mount.d/70btrfs
Append this line bellow pass=$6:
btrfs_options="ssd,noatime,compress=zstd,space_cache,autodefrag"
and change to:
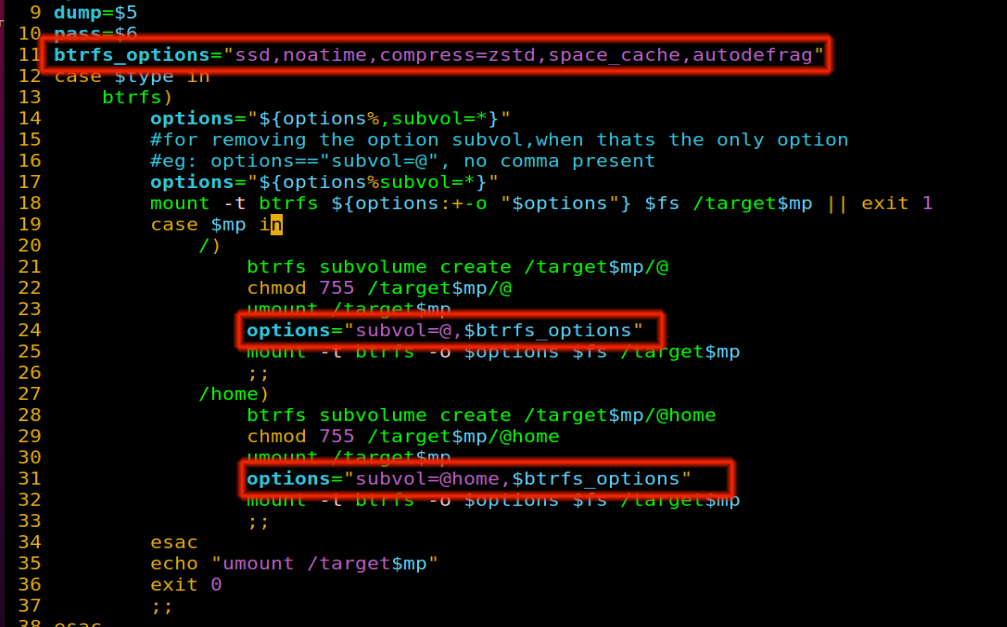
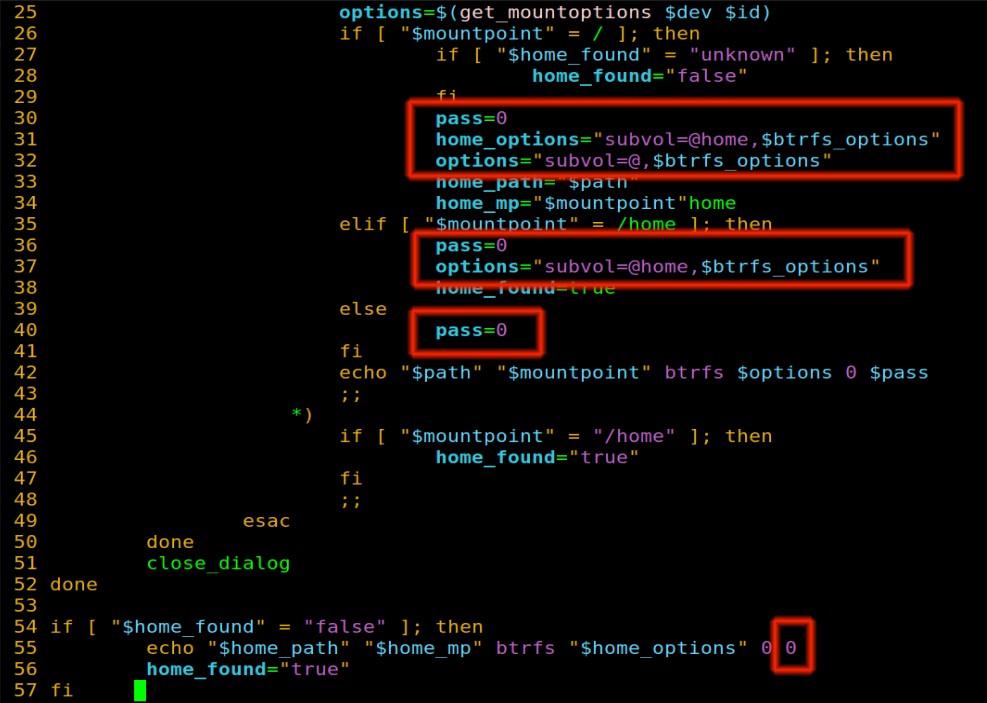
Edit the file /usr/lib/partman/fstab.d/btrfs:
Start the console and type:
$ sudo vim /usr/lib/partman/fstab.d/btrfs
Append to line 6, bellow home_found=“unknow”:

And change to:
Start the Ubiquitu Install
$ ubiquity
Partitioning
It is very important, in this stage, you need choose “everything else”.
We will create only three partitions:
- efi with 512Mb
- Swap
- / btrfs remanning space
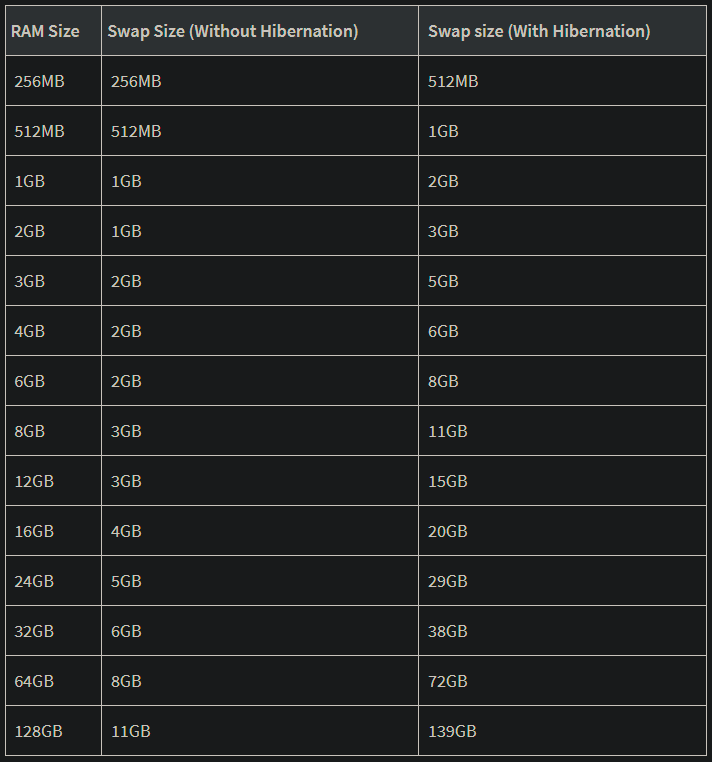
If you have have doubt about swap space necessary for you, see the table bellow:
If you want learn about btrfs and snapper, you can visit the site in description and i prepared links for your study.
2. Update and Upgrade
Let´s go perform a system Update and Upgrade.
$ sudo apt update
$ sudo apt upgrade
$ reboot
3. Install grub-btrfs
Any moment, you can visit the site in description and get every link and commands i gave here.
$ sudo apt install build-essential git vim
$ git clone https://github.com/Antynea/grub-btrfs.git
$ cd grub-btrfs
$ sudo make install
4. Snapper
$ sudo apt install snapper snapper-gui
$ sudo snapper -c root create-config /
Edit /etc/snapper/configs/root:
Put your username on line 21 between the quotation marks.
ALLOW_USERS="your_username_here"
Go to line 50 and change to:
# limits for timeline cleanup
TIMELINE_MIN_AGE="1800"
TIMELINE_LIMIT_HOURLY="5"
TIMELINE_LIMIT_DAILY="7"
TIMELINE_LIMIT_WEEKLY="0"
TIMELINE_LIMIT_MONTHLY="0"
TIMELINE_LIMIT_YEARLY="0"
This parameters are sugestion on Arch Linux Wiki with only 5 hourly snapshots, 7 daily ones, no monthly and no yearly ones.
5. Subvolume for Snapshots
We will create one btrfs subvolume to snapshots.
$ sudo btrfs subvolume delete /.snapshots
$ sudo rm -rf /.snapshots
$ sudo btrfs subvolume create /.snapshots
$ sudo sudo chmod a+rx /.snapshots
$ sudo chmod 750 /.snapshots
$ sudo chown :your_username /.snapshots
Edit /etc/fstab:
Here we will copy the line with subvolume @ and modify to snapshots.
Append in the end off fstab the line with UUID for your device and change the parameter as example bellow:
For example:
# Snapshots subvolume
UUID=e52e9f95-b7aa-4bae-a0f9-bf769802cc74 /.snapshots     btrfs   defaults,subvol=/@/.snapshots,ssd,noatime,compress=zstd,space_cache,autodefrag 0       0
$ sudo mount -a
$ sudo btrfs subvolume list /
$ lsblk
6. Start the Services
Now, we will start snapper services, include timeline, cleanup snapshots and grub-btrfs.
$ sudo systemctl enable --now snapper-timeline.timer
$ sudo systemctl enable --now snapper-cleanup.timer
$ sudo systemctl enable --now grub-btrfs.path
$ reboot
7. Create your First Snapshot
$ snappper-gui
Follow the video…
As you see, the grub menu now have new option, the ubuntu snapshots.